Monday, December 22, 2008

River Valley Middle School Photography Enrichment Photos!

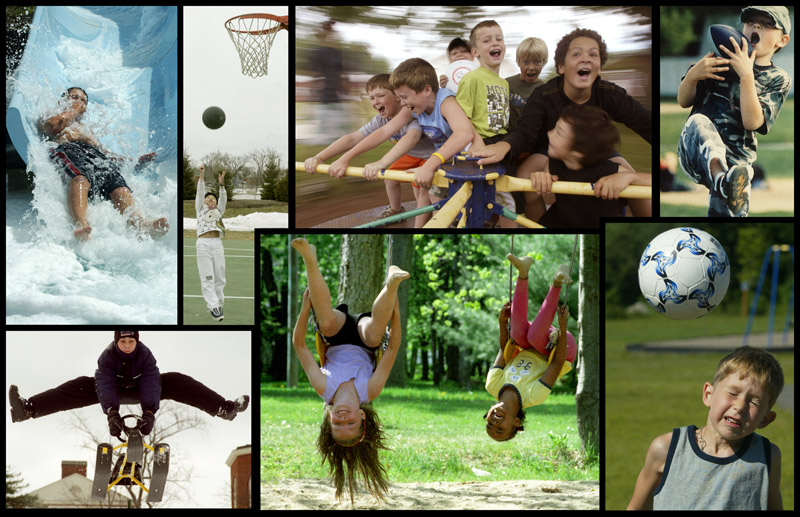
I finished a photography enrichment program with students at River Valley Middle School, and wanted to share some of the photos and talk about the experience. This is the third year I have done this, and each year the photos keep getting better and better!

First off, you can view a selection of some of the best shots here:
http://www.noelchenier.ca/GALLERY/rivervalley2008

For this year, we were able to get a grant from the Artists in Schools program. This meant we could teach 35 students, plus 7 helpers from previous years!

The first two days were spent going over the basics. The various genres of photography, the different styles of portraits, and some technical basics of photography. The students took portraits of each other using different lenses and shutter speeds to see how they affect the photograph.
We also had fun playing around with perspective!

The second week was spent using studio lights and doing portraits.
The students learned all the various types of equipment and styles, then photographed each other. We used a variety of backgrounds(black, white, patterned) and lighting set-ups(two light, single light, monster light, crystal ball) I was really impressed with the students as they began moving the light around, trying different angles and posing, and changing the look and feel of the portraits.

Again, to see some more of their great work, head here:
http://www.noelchenier.ca/GALLERY/rivervalley2008

If you'd like to see work from previous years, check them out here:

http://www.noelchenier.ca/GALLERY/rvalley2008
http://www.noelchenier.ca/GALLERY/rvalley


Sunday, December 21, 2008

Merry Christmas!

Just wanted to take this time to wish you and yours a very Merry Christmas and a safe and happy holidays!

I hope Santa brings you lots of photographic goodies!

Noel

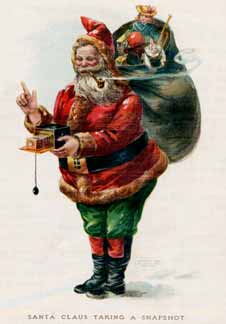
Ps-in case you were wondering, the photo attached was done by creating a duplicate layer of the original photo, then applying a GRAPHIC PEN filter(FILTER->SKETCH-GRAPHIC PEN)
This made the image black and white, but then I lowered the opacity of the top layer to 25% which brought the color back.

Thursday, December 18, 2008

Have You Been Good This Year? Santa should bring you....

Thought I'd put together a photography equipment Christmas wish list for you all.

A NEW TRIPOD!
You've spent hundreds or thousands of dollars on camera equipment, so it's not a good idea to go cheap with what you're going to use to support it.
So you want a MANFROTTO. They are well built, sturdy, and easy to use. They are not the cheapest, but are worth the extra money. These are the models I recommend:

MANFROTTO 055PRO or MANFROTTO 190 PRO

The 055 is sturdier, heavy, and taller than the 190PRO. Both models allow you to remove the middle pole and mount it upside down or horizontally.


You will also need to buy a tripod head.

TRIPOD HEAD
Manfrotto 484RC2 Quick Release Ball Head
Manfrotto 222 Joystick(with quick release)
Manfrotto 322 Grip Action head

For the extra $15, buy the 484RC2, which has a plate that stays on your
camera and allows you to quickly attach and detach it from the tripod.
The joystick is the coolest head available. To move it, you grip the
joystick and let it go when it's positioned where you want. The 322 is similar but is a bit more compact.

If you've been a really good photographer, you get the Manfrotto CARBON(055CX or
the 190CX).
They are twice as expensive but since they are made from carbon they are lighter weight and just as sturdy. Manfrotto 222 Joystick(with quick release)
or the Manfrotto 322 Grip Action head.

If you've been bad.....you keep the same plastic tripod.

ZOOM LENS
You want to have a 70-300 lens for portraits, candids, action, and landscape and nature shots. You could buy the canon or nikon models, but they don't have a macro(close focus)

Here are the lenses that have the 1:2 macro. Comes in canon/nikon mounts,
links are for the canon mount. Applebys in Saint John usually has them in stock, if they don't Henrys in Toronto is a good option.

Tamron 70-300 $229
Sigma 70-300 $199.99
Sigma 70-300 APO glass(better quality) $319.99

If you've been really good...you get the Nikon 80-200mm 2.8 or Canon 70-300mm 2.8.

If you've been bad.....you get a Vivitar 70-300 4.5-5.6 manual focus lens from 1970.

MACRO

If you like doing close ups of bugs, flowers, etc, you want a macro lens!
Nikon and Canon both make macro lenses. These lenses have quieter autofocus than the sigma or tamron, but they do cost a bit more. Personally, I use manual focus most of the time with macro, so I don't care about the sound.

Recommended models:
Sigma 105mm 2.8 macro
Ramron 90mm 2.8 macro

If you've been really good....a Nikon 105mm 2.8 or the Canon 100mm 2.8
If you've been bad...you get a set of close up filters secondhand from 1970.

BIG LENSES

For those who do serious nature or sports photography, you will want to buy a bigger lens.

Canon 100-400mm 4.5/5.6 IS $2000
Nikon VR 80-400 F4.5-5.6

Other brands:
Sigma 170-500mm F5.6-6.3
Sigma 135-400mm F4.5-5.6
Sigma 50-500mm F4-6.3
Tamron 200-500mm F5-6.3

If you've been really good...
A 300 or 400mm 2.8 lens.

If you've been bad....a Vivitar 2x Tele-Converter from 1970.

FLASH
When the pop-up flash won't do (and it won't) you may want to put a flash on your Christmas list!

Nikon SB-600 or Canon 430EX does the job.

If you've been really good,
Nikon SB-900 /B-800, or Canon 580EX, with a set of Pocketwzards!

If you've been bad...a Vivitar 283 from 1970
Happy holidays, hope Santa brings you what you deserve!

Friday, December 5, 2008

Tis the Season for Christmas Concerts!

With Christmas concert season upon us, I thought I'd give some tips on getting the best shots!

1. GET CLOSE!!!!
If you stand and take pictures from the back of the crowd, your image will look like the one above. Dark and underexposed, because the light from the flash can't reach that distance.
If you are lucky enough to arrive early to get a front row seat or in the first few rows, you are fine. If you didn't, you still want to get a close as you can. Most places have a center aisle, just make your way down to the front, staying as low as possible so you don't block anyone's view. Pop up to take a shot, then pop back down. Once you've got a few good shots, feel free to go back to your seat.


2. Light and Exposure

TRYING TO SHOOT WITHOUT FLASH
Unless the concert is at a real theatre with proper stage lighting, there most likely there will not be enough light to get a handholdable shutter speed. One option is to turn the ISO up to 1600, but that is going to make the images very noisy and soft. You could try putting the camera on a tripod, but if the subject moves at all, they will be blurred.
So most likely to get any sharp pictures, you will have to use flash.

SHOOTING WITH FLASH
Again, you want to GET CLOSE. Standing from the back and using the flash will not get you good shots. The problem with flash of course is that it is very harsh. If you have a ceiling that is low enough, try to bounce the flash. This is what I did in the picture below, and you can see how nice a soft the light is!


WHAT MODE/EXPOSURE TO USE?

1. Use MANUAL(M) mode. Chances are the automatic modes like shutter/aperture priority are not going to give you proper exposure or they will use too slow shutter speeds giving lots of blur. That's not what you want!
2. Choose ISO 400
3. Set the shutter speed to 1/60th of a second or 1/125th of a second.
4. Set the aperture to F8. Yes, by doing this your camera meter isn't zeroed, it's in the minus. That's fine.
5. Pop up or turn on your flash and set it to TTL mode.
6. Take a test shot.

If the image is too bright, use your FLASH EXPOSURE COMPENSATION( LIGHTNING BOLT SYMBOL+/- , found on the camera or under the functions menu) to turn the flash power down. Take another shot, and if the image is still too bright, turn it down more. If you are already at the lowest setting, turn your aperture to a higher number(ex-F8 to F11)

If the image is too dark, use the FEC to turn the flash power up. Take another shot, and if the image is still too dark, turn it up more. If you are already at the highest power setting, turn your aperture to a smaller number(ex-F8 to F5.6) to let in more light. If it's still too dark, turn up the ISO...or GET CLOSER!

By using these settings, you should get sharp images of your loved ones as they bring on the holiday cheer!

Any questions, send me an email!

Happy shooting!

Noel


Photographing a Luthier....What's A Luthier? Click to find out!

What's A Luthier? Click to find out!

So a Luthier is a maker of stringed instruments. I had the pleasure of photographing local Luthier Gwyneth Wilbur at her home just outside St. Andrews for Salon. The neat thing about her is that she has started to use local wood to build her violins instead of using imported wood from Italy. So my idea was to get shots of her alongside some of the local trees that she uses for materials.
The photo above was my absolute favourite shot and it was the one they ran huge on the salon front. Lighting wise, I used a flash fired into an umbrella on a stand at a 45 degree angle on the left of her. This provided a really nice soft light that spread out to cover her and some of the background. I also slightly underexposed the ambient light exposure to make it go a bit darker and make her stand out.

I also had to take shots in her workshop. Again, I used a flash shot into an umbrella to create the look of soft window light coming into the workshop(which there was, but it just wasn't bright enough)


I then wanted to get some shots of the violin itself. I had to do some detail shots, and we pinned up a red cloth to use as a background. A more contrasting background might have been better, but I didn't mind the color.

She had this really nice window, and I thought the woods behind would supply a nice background. So I put a snoot on my flash and put it on a stand to shine down from above to create a spot light effect.


Then I wanted to accentuate the warm colors of the violin. So I changed the white balance to TUNGSTEN, which then made the outdoor light very blue. Then I placed a CTO gel on my flash, which changes the light from the flash to tungsten, resulting in proper color on the violin.


After doing the shots of Gwyneth outside, I decided to try some shots of just the violin in the natural setting.


For this shot, I used a snoot on the flash to create a spotlight effect, and then had Gwyneth hold the flash directly above the violin. This was one of my favourites, but unfortunately didn't run in the Telegraph. :(


Wednesday, December 3, 2008

Awesome Video Made From 5000 Still Photos!

Sorry that it's been a while since my last update. I've got some good stuff coming up, just give me some time! I do however want to feature a great video created by a colleague of mine, Dan Culberson. It's a really cool vid made from over 5000 still images! It also has an important and timely message with the holidays coming up.

While You May Be Busy from Dan Culberson on Vimeo.

If you can't see the movie, click here.

Was that awesome or what!!!

Here is how Dan Culberson made the video:

I photographed everything on Small Fine JPEG, high burst drive. That way I could fire off well over 100 continuous shots before it buffered. Also, it made editing later easier.

I basically just kept the camera close by during my shopping trip and fired off bursts of frames much like you would with a video camera.

Some people have asked--no one hassled me at all about shooting inside Superstore, but I sure got a lot of weird looks.

All totaled I took over 5000 individual frames and edited them down using Pinnacle's home video software. The actual frames render about 250% the speed they were shot at.

The soundtrack was purchased from premiumbeat.com.

For you Mac users, you could probably do this in iMovie. Just a suggestion on my part, if you wanted to try this, I'd pull out that original Canon Rebel or Nikon digital that is sitting in the closet. 5000 shutter clicks is a lot of wear on the shutter!

You can view more of Dan's great work at
http://www.danculberson.com
http://www.shoottheband.ca


Sunday, November 16, 2008

Some Recent Work Posted on my gallery

Hello all. Posted some more recent photos taken for the Telegraph-Journal on my student gallery(It's only fair that since I expect my students to post that I post too...don't want to be a hypocrite!) Posted some info on the pix too!

View em here:

http://www.noelchenier.ca/GALLERY/2008noelpix

While you are there, please take some time to browse some of the great photos taken by my students! There are some awesome images there.


Tuesday, November 11, 2008

Remembrance Day Photographs

I happened to be looking through images relating to Remembrance Day and came across a few images I'd thought I'd share.

The top photograph is of Veteran Art Pottle, who fought with the 1st Special Service Force, AKA The Devil's Brigade, during WWII in Italy and Southern France. It was taken at the New Brunswick Museum in Saint John in November of 2006 to go along with a story about a war themed exhibit at the museum. The assignment was to get Art with the exhibit, but I thought I'd try to get an interesting portrait as well.

For lighting, I used a Canon 580 flash on slave mode a stand with a snoot to create a spotlight effect. The snoot also prevented light from hitting anything in the background and created the darkness. I placed the flash high and to the left of Art, and tilted it down to create the directional light. I used the on camera flash as a master, set to 1/128th power and bounced off the ceiling so the light would not be exposed by the camera.

I also came across a picture that I took ten years ago at Remembrance Day ceremonies in Fredericton. It is a picture of 2nd Lt John McNair as he looks towards the sky during the moment of silence. When I look at this picture, I really feel that I captured was this day is all about-the lines on the face, the expression of sorrow as he looks towards the heavens, the rain drops on his glasses, to me, that all says Remembrance Day.


Monday, November 10, 2008

What the #$%^ Did the Lab Do To My Picture?!?!?!

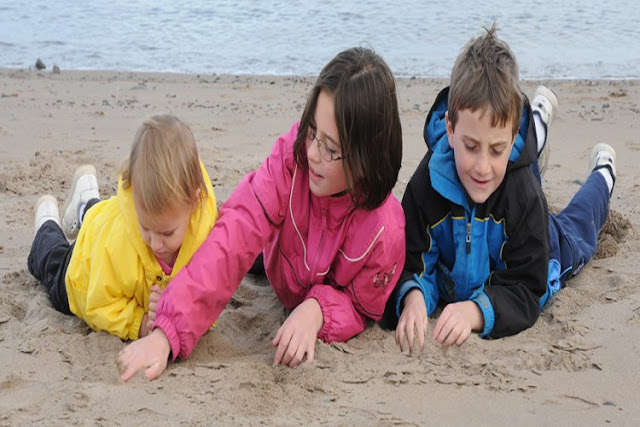
Ever take a photograph to get printed at the lab, and it comes back squished(image above) or cropped completely different from how you cropped it? I'm going to help you prevent that from ever happening again!
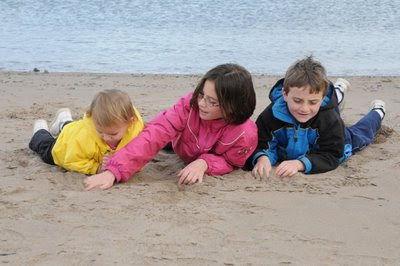
So here is my original photo. Nice enough picture of my three munchkins at the nature park, but I want to get rid of the excess sand and water. So in Photoshop, I get out my crop tool and crop it panoramic.
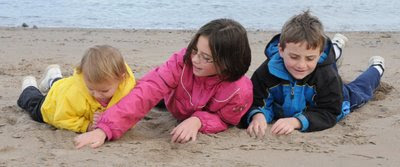
There. Much better, really focuses on them. So I take my card to my favorite lab to get a 4"x6" print made. And what I get back is this:
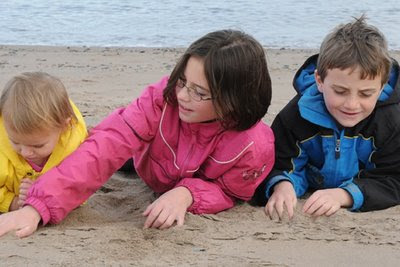

An image totally cropped in. Or THIS!!!!!

An image where they have been squished! What the heck went wrong?

A full frame image is the same height/width ratio as a 4"x6" print. By cropping an image, I've just made it a completely different ratio. So, the machine printing the image will either crop out parts to make it fit that ratio, or squish or stretch the image to make it fit that ratio. You need to take a few seconds to prepare the image before saving it so that it will print correctly!

HOW TO RESIZE IMAGES PROPERLY!

Step 1: RESIZE THE IMAGE

In Photoshop CS-CS4, select IMAGE->IMAGE SIZE. (IMAGE->RESIZE->IMAGE SIZE in Elements). The Image Size box will appear. If the image is a horizontal, select the WIDTH and type in the width of the print you want(In this case, we are doing a 4x6, so I type in 6. If the image was vertical, I'd select the height first). By selecting 6", you can see the Height went to 2.477". If I were to leave it like this, I'd get the squished or cropped print.
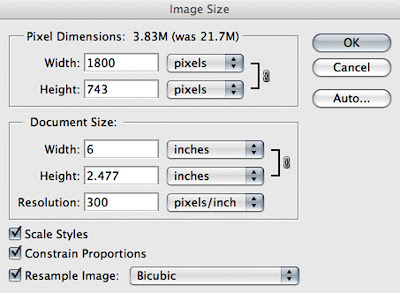

Step 2: INCREASE THE CANVAS SIZE

This is the key second step. In Photoshop CS-CS4, select IMAGE->CANVAS SIZE. (IMAGE->RESIZE->CANVAS SIZE in Elements) The Canvas Size box will appear. Make sure that RELATIVE is UNCHECKED.
Now, I will type in 4" for the HEIGHT(or change the width if the image was a vertical). Then I pick my CANVAS EXTENSION COLOR(WHITE or BLACK). Then click OK.
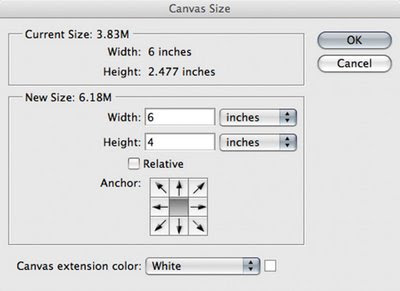

And there you go! The image below is now 2.477"x6", but fits on a 4"x6" canvas! So my print will not be cropped or squished, it will print correctly!
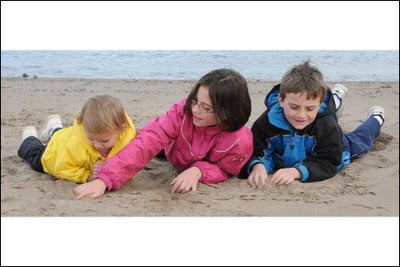

One other thing to mention! 8"x10" is considered a standard size for making a larger print. However, this is not the same ratio as the full frame captured! The same ratio print would be an 8"x12"! So if you print a frame 8"x10", you end up losing an inch on either side of the frame!
The image below was printed 8"x10" instead of 8"x12"and I lost the edges.
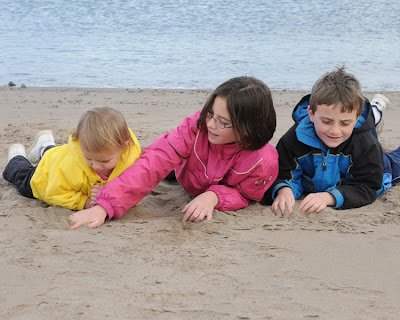

CROPPING TO THE RIGHT SIZE
To ensure your print is the exact size you want, use the CROP tool and set a specific size that you want it to crop to!
Pick the CROP tool, then type in the HEIGHT, WIDTH, and RESOLUTION (200-300) that you want. So below, I put in a width of 12 inches, height of 8 inches, and resolution 250. Then I use the crop tool and select the part of the image I want and it's ready to print at the right size!

Then when I send the picture to the lab, and TELL THEM TO PRINT 8"x12", you get a full frame image on an 8x12!

There! Now you should be able to get the exact size prints you want from your favourite lab, with no squishing, stretching, or cropping!

Happy shooting!

Noel Chenier
www.learnphoto.ca
Connect with Noel on:
INSTAGRAM: http://www.instagram.com/nchenier
TWITTER: @noelchenier http://www.twitter.com/noelchenier

I hope you find these tips useful!
If so, it would be awesome if you would check out my Photography Assignment Generator Apps on the app store, a unique photography app that's meant to inspire you to take great photos! Perfect for anyone taking part in a Photo 365 challenge, there are over a hundred individual assignments and hundreds of thousands of potential random ones. Versions available for iPhone/iPod and iPad, including free versions so you can try them out! Full details, including reviews and tour videos of the apps can be found at www.learnphoto.ca/apps

Even if you only download the free version that would help get it up the app store lists!


Monday, November 3, 2008

Upcoming Photoshop/Studio Portrait/Advanced Flash Courses!

I've set the dates for my next slate of weekend courses. Please take a look and if you are interested in attending, please contact me via the methods below. For those in Fredericton, as soon as I know if there are any carpool opportunities I will let you know.
Please feel free to forward the info on to anyone else who may be interested.

1)Beginner Photoshop for Photographers
2)Studio Portrait Workshop

3)Advanced Flash Workshop


1)Beginner Photoshop for Photographers

Two Day Course, Sunday Nov 16, Sunday Nov 23 9-4:30pm on both days
Location: V.A. Snow Centre, Hamton(tentative)
Cost: $150, includes a comprehensive manual complete with all information/techniques covered with illustrations.

About the Course
As a user of Photoshop on a daily basis over the past ten years, I will teach you all the basic Photoshop tools and techniques you can use to manipulate and enhance your images.

During the course, you will learn
-all the basic tools(crop, selection, move, brushes, etc)
-how to resize images for various uses(print, email, online)
-the various file formats and when to use them
-how to use layers to combine images
-adding text to images
-proper techinques and tools to retouch, adjust, color correct, and sharpen
your images
-retouching old photographs
-how to hand color images

and tons of other fun and creative ways to make your photographs look great!

Assignments will be given to complete during the week between classes to give you time to work on the skills and knowledge gained.

To see some of the images created during my last workshop go here:
http://www.noelchenier.ca/GALLERY/photoshop

Required for the course:
-A mac or PC laptop with the following software installed
-Photoshop CS/CS2/CS3/CS4
or Photoshop Elements version 5.0 or higher
If you have not yet purchased a version of photoshop, you can download
demo software here: www.adobe.com
(you will need to register for an adobe ID, but you then can get access
to lots of stuff) NOTE-THE DOWNLOADS ARE A THIRTY DAY TRIAL, WHICH STARTS ONCE YOU DOWNLOAD THE DEMO, NOT WHEN YOU INSTALL IT. SO IF YOU ARE GOING TO USE THE DEMO VERSION, DOWNLOAD IT THE WEEK BEFORE THE COURSE!
-images, and lots of em! Pictures of people, textures, etc. A full list of
required shots will be given, I will also provide examples for students to
work on.

2)Studio Portrait Workshop


Ever wanted to take a great portrait like the ones done by professional portrait photographers? Now is your chance.

During this one day course you will be introduced to the various equipment and techniques used to create professional quality portraits. You will learn standard and creative lighting techniques, use a variety of backdrops, and learn how to pose a subject.

The morning will be spent going over the equipment and techniques, then you will use what you've learned and photograph people at the various set ups. Depending on how much interest there is, we will have two 3 hours shooting sessions for each group, one from 12-3, and another fom 3-9pm. Lighting equipment is being supplied by Appleby's Image Source of Saint John www.applebys.com

Required for the course
Film or digital SLR
Subjects to pose for your portraits

For some examples of the kinds of photographs we'll be taking, browse:
http://www.noelchenier.ca/GALLERY/light
http://www.noelchenier.ca/GALLERY/rvalley
http://www.noelchenier.ca/GALLERY/rvalleyselect

Where: Our Lady of Perpetual Help Church, Rothesay
When: Saturday Dec 6th
Times: 9am-12pm as a group, then
First shoot session from 12-3pm, second shoot session from 3-6pm
Cost: $100

3)Advanced Flash Workshop


Want to take better photographs with your flash? Not happy with the results you are getting? Then attend one of my advanced flash workshops!

Topics we will cover include:
-Use of TTL and manual exposure modes with your flash to get proper exposure.
-off camera and wireless flash, how and what accessories are needed to do it and use it effectively
-using multiple flashes
-creative lighting with flash
-balancing flash with ambient light
-balancing flash with different lighting temperatures(flourescents, tungstens)
-use you flash as a studio light
-using flash outdoors

We will go over the various techniques and set ups, then pair up and take photographs using them at a variety of stations I will set up in the large room.

For some examples of the kinds of photographs we'll be taking, browse:
http://www.noelchenier.ca/GALLERY/advancedflash
http://www.noelchenier.ca/GALLERY/advflash

Where: Our Lady of Perpetual Help Church, Rothesay
When: Saturday Dec 13th
Times: Two separate sessions 1)9am-3pm 2)3pm-9pm
Cost: $50

Required for the course

Film or digital SLR
At least one accessory flash(Nikon sb 800/600, Canon 580EX/420ex, Vivitar 283/285 etc)

Optional-any extra flashes or flash accessories(cords, slaves, etc) you own, even older ones from film cameras.
Tripod

To register for a course contact Noel by any of the following methods

best- email: nchenier@nbnet.nb.ca
Phone: 657-FOTO(3686)

Head to http://www.learnphoto.ca/ for more info on the courses, student
testimonials, etc.

To see some of the awesome work done by some of my students, head to
http://www.noelchenier.ca/GALLERY/

ABOUT NOEL CHENIER
Noel Chenier is an award winning staff photographer for the New Brunswick
Telegraph Journal. His work has appeared in newspapers and magazines across
North America, and can be viewed on his website at http://www.noelchenier.ca
Noel has a Bachelors of Adult Education from the University of New
Brunswick and was previously a part time photography instructor at the New
Brunswick College of Craft and Design in Fredericton.
_________________
Noel Chenier
----------------------
Photographer and teacher
Portfolio
http://www.noelchenier.ca
Photography Courses Website
http://www.learnphoto.ca
nchenier@nbnet.nb.ca

Wednesday, October 29, 2008

Tips for Great Halloween Shots-Pumpkins, Costumes, etc!

Since Halloween is upon us, I thought I'd give out some tips on how to get some great pumpkin, costume, and other pix!

PUMPKING PIX
Great pumpkin shots are easy to do! Light em up with a candle and fire away, right? Sure, but you will have to do the proper metering to get the best shots. If you go with just what the meter wants, chances are you will get a pumpkin that is too dark on the exterior and too bright inside(photo on left). Instead, you could meter from the exterior skin of the pumpkin(get in close and fill the frame with only the pumpkin skin, or use your spot meter) or set your +/- in the PLUS, to get the middle photo. If you want just the light from the pumpkin, then you take your meter reading more from the light inside the pumpkin(get in close and fill the frame with only the light in the pumpkin, or use your spot meter) if using Manual(M) mode, or if you are using Shutter(TV/S) or Aperture Priority(A/AV) mode you will most likely have to set your exposure compensation(+/-) to the MINUS, probably -1 or -2. Remember to see it back to zero when you are done!
You may want to turn the lights down in the room to get more darkness. Also, a candle will give a warmer light than LED's. To really warm up candle light, set the white balance to DAYLIGHT, or use TUNGSTEN if it's too warm. If you find your LED light is too cool, try using SHADE or OVERCAST white balance to warm it up.
You will also need to use a tripod as the light will be very low and your shutter speeds will be slow. So you could also try zooming and panning to get some neat effects!

COSTUME SHOTS

To get some great costume shots, I would suggest finding a nice plain wall you can stand the subject against. Then, use a flash bounced off the ceiling to get a softer light that won't cast dark shadows against the wall.
You are wondering, Noel, how did you get that old kind of look on those pics? Well, they were taken using an old twin lens film camera, and I basically shot blindly with the flash with what I thought would be a good exposure and ended up underexposing every shot. So the old look is basically underexposed film printed lighter then scanned and worked a bit in photoshop. No, that wasn't what I wanted to do. But when life gives you lemons, make lemonade....they look fine in black and white of course...

Obviously if you are going to get shots of the kiddies out in their costumes, you will have to use flash as it will be very dark. Use MANUAL shooting mode(M), set the shutter speed to 60th/second and pick an aperture of F8, pop up the flash and use the flash exposure compensation if it's too bright or too dark. If you want to try to get some more ambient light, turn the shutter speed lower(1/15th or 1/8th) to get more light and some funky blur.

MONSTER LIGHTING!

If you want some spooky shots, use MONSTER LIGHTING! You want to have a light source that comes from below, either a high powered lamp, flashlight, or your flash. Place it right underneath the subject's face so you get lots of creepy shadows, as get them to make a scary face. If you are using a lamp or flashlight, make sure that you take your meter reading more from the brighter areas(zoom in on them or use your spot meter) if using Manual(M) mode, or if you are using Shutter(TV/S) or Aperture Priority(A/AV) mode you will most likely have to set your exposure compensation(+/-) to the MINUS, probably -1 or -2. Remember to see it back to zero when you are done!
If you are using your flash, you will need to use an off camera flash cord or trigger it wireless and hold it under the person's face. Try a manual setting of 60th/second at F16 or F22, and adjust the flash power as necessary!

Good luck, and Happy Halloween! Post some pix on the gallery if you get some good ones!


Tuesday, October 28, 2008

PIXELS TO PRINT: THE ART OF PHOTOJOURNALISM the BOOK! Only $20

Need to finalize how many people are interested in getting copies of Pixels to Print: The Art of Photojournalism. Due to the number of copies already requested, the price will now be only $20, which will include shipping and taxes. If you would like copies, please let me know how many by MONDAY November 3rd. It will take about two weeks for them to arrive. It would be a nice Christmas gift for anyone who likes photography!

If you are interested, please reply to me at nchenier(at)nbnet.nb.ca, and forward this info on to anyone else you think may be interested!

About the book:
As many of you know, myself and my photo colleagues at the Telegraph Journal recently had an exhibit of our work, Pixels to Print: The Art of Photojournalism in Saint John and Fredericton. The book is a catalogue of every image in the show. The book is 7" high by 9" wide, full colour printing.

You can view a preview of the book here:
http://www.lulu.com/browse/preview.php?fCID=2742421

***NOTE-DO NOT CLICK ON ADD CART! If you order through the website, you will have to pay for full shipping and taxes as well!****

Exact specs:
9" x 7", perfect binding, white interior paper (80# weight), full-color interior ink, white exterior paper (100# weight), full-color exterior ink


Thanks

Noel


Tuesday, October 21, 2008

Monday, October 20, 2008

Meteor Showers this Week! Here's How to Shoot Em!

The annual Orionid Meteor Showers is happening this week from Oct 20-24th, so get out your tripods and go shoot them! Here's some tips on how!

Pre-Shooting Preparation:
Charge your batteries fully before going out. It will be cold and that can affect battery life.
Wear some warm clothes, a hat, and gloves. Bring some hot beverages, some friends, and make it a fun outing! At least you'll have someone to talk to between exposures.
Also bring a flashlight or LED keychain light so you can see what you are doing when changing your settings. A headlight looks dorky, but it let's you works with both hands.

Time to Go Out:
Here's the problem. They are best viewed after midnight, with 3-4am being the prime time. There could be as many as 40-60 meteors per hour. The peak night will be October 21st. Also, the later you go, the less moon will be in the sky which will make the meteors stand out a bit more.

Where to Go and Sky Conditions:
You want to be as far away from the City/Town as possible to reduce the amount of light pollution. Find a dark road out in the country somewhere far away from street lights.
Obviously it has to be a clear night that you can see the sky. Long range forecast look good for Tuesday, not so good Wednesday, and good for Thursday, Friday.

Finding Orion:

Orion is one of the easiest constellations to find(it's the three stars close together that form the belt of Orion). At the time you are going out, it should be in the South East/Eastern part of the sky.

Do I Need A Tripod?
Yes, and the heavier the better!

ISO:
Start with 400 ISO and see how much detail you can pick up. If you aren't getting enough details, try 800 ISO.

Lens:
You want to use a wide(16-35mm) to normal lens(50mm) so you can get a wide range of sky area.

Shooting Mode:
Has to be MANUAL as you need to set the shutter speed and aperture.

Shutter Speeds:
The longer the speed you use, the more meteors you will get. However, if you go too long, the stars will begin to form trails.
To figure out how to long to shoot the stars without getting trails, divide 600 by the length of your lens, and that is how many seconds you should use. For example, if you are using a 17mm lens, 600/17mm= 35 seconds.
However, if you do long exposures like 30minutes to 1 hour(or longer), you will get star trails that look neat along with the straight lines of meteors. The photo above was done for three hours(although you can see the light pollution made the sky brownish instead of black!) Note you will need a cable release or remote, and use BULB mode to do this. No way you can hold the button down for 1-3 hours...

Aperture:
Use your widest aperture (smaller number, for example 3.5/4.5/5.6) to let in as much light as possible. If you find the meteors coming out a bit bright, you can stop down one setting. If you have a lens that has a really wide aperture(1.8/2.8) that is even better!

Focus:
You have to use MANUAL focus and focus on the stars or set the focus on the lens to Infinity.


Other Shooting Tips:
-If you want to include trees, mountains, the horizon, etc they will provide an interesting silhouette shape and scale.
-You could also try using a flash during the exposure to light up the trees!
-Have an old film camera kicking around? Haul her out, throw in some ISO 400 film, and take some long exposures!(You have to have a cable release)

So go out there, have some fun, try not to freeze to death, and send me some great shots or post them in the online student galleries if you have a login!

Wednesday, October 15, 2008

So Mr Silhouette...How Do You Do One?

My thanks to colleague Kevin Barrett, who pointed out that I forgot to mention in my posting on how much I loved silhouettes how to actual make a silhouette...Some teacher I am!


Well, silhouettes are very easy.
First, you need to have a subject that is backlit. A subject in front of a window with bright light behind it or a subject in the shade with full sun on the background behind them. Then, you need to expose for the background.
If you are using MANUAL metering mode(M), fill the camera frame with the BACKGROUND(don't get any of the person or subject you want to silhouette!) and get a proper exposure. Then when you recompose the scene to take the photograph, ignore the fact that the meter is now in the MINUS(-). You want that. Take your shot.

If you are using Shutter Priority(TV or S), Aperture Priority(AV or A), or Program mode(P), then use your EXPOSURE COMPENSATION(+/-) and set it to MINUS 1(-1.0) if the subject is small in the frame, or MINUS 2(-2.0) if it is larger in the frame. This will tell the camera to take it's average meter reading and darken it down a bit to get the silhouette.

Have fun!

Noel

Thursday, October 9, 2008

I'm a Sucker for Silhouettes......

Anyone who knows me won't be surprised by the title of this blog entry! I can shoot anywhere from ten to thirty silhouettes a year, easy.
The one above is one of my favourite photographs I've taken. It is of a member of the 2nd Royal Canadian Regiment in downtown Fredericton while taking part in training in the urban environment for upcoming peacekeeping duty in war-town Bosnia-Herzegovina. I had been with them all afternoon documenting their various scenarios, and was walking down Queen Street to go back to the office. I looked across the street and saw the warm late afternoon fall light on the Justice building, and a line of soldiers silhouetted as they walked past. I ran down the street, hunkered down between two cars, and got two frames(this was back in the film days) of the last soldier framed by the archway of the entrance with the word Justice above.

One of the reasons I like silhouettes is that the lack of detail on the subject really makes the viewer focus on the other parts of the image.

So while the child is important in this picture below, you really see the multiple hand prints created on the frosted glass of the Beaverbrook Arena in Saint John. I could have used a flash to fill in the light so you could see the child, but that would have taken away from the handprints.


Sometimes the advantage to the silhouette is so the people are not identifiable. For the shot below, I couldn't get permission from the parents of these kids, but making them silhouetted you can't tell who they are, so I was able to get my shot.


People hate having their picture taking smoking, drinking and playing VLT's, so I use silhouettes so they aren't identifiable and don't need to give me their names. The silhouette provides an interesting shape, but the colour of the flame is what draws you in. Of course the paper ran this in black and white... :(


For the kids below, I didn't have to silhouette them, I could have exposed for them and gotten detail. But then the sunlight reflecting off the river would have been way overexposed. So instead I exposed for the reflection and went for the silhouette.

The dragon boat shot below is another example. The boats were backlit, so even if I had exposed for the people(which I did for a few shots to please my editors of course...) they would have been surrounded by bright areas and probably would have flaring around their heads.


Sometimes I go to events that are frankly.....visually boring. News conferences and speeches are the types that usually fit this category. The photo below was taken at a meeting of ambassadors in St Andrews. The speakers stood up at a podium that was far to the left of the head table, and the background was nothing but a hotel room wall...ugh.
A certain gentleman was speaking, and I noticed the interesting light behind his head that really showed his profile.

The shot below is from a training exercise for the reservists in Saint John. The scenario was they were attacking a position of insurgents. We were allowed to be with the insurgents to document the attack. Great right? Except for the fact this was at 7am in the morning, and the sun was rising right in front of us. That meant no light on the soldiers, and flaring from the sun. Then the soldiers rolled in some smoke grenades, creating a huge cloud of red smoke, and I had my front page picture!


For the fire shot, I loved the smoke and the red flame at the bottom, so I didn't use the flash to light the firefighter to keep the mood.


And sometimes you've got great lines, shapes, and patterns, and the silhouette is the way to show it off!


So Mr Silhouette...How Do You Do One?

Well, silhouettes are very easy.
First, you need to have a subject that is backlit. A subject in front of a window with bright light behind it or a subject in the shade with full sun on the background behind them. Then, you need to expose for the background.
If you are using MANUAL metering mode(M), fill the camera frame with the BACKGROUND(don't get any of the person or subject you want to silhouette!) and get a proper exposure. Then when you recompose the scene to take the photograph, ignore the fact that the meter is now in the MINUS(-). You want that. Take your shot.

If you are using Shutter Priority(TV or S), Aperture Priority(AV or A), or Program mode(P), then use your EXPOSURE COMPENSATION(+/-) and set it to MINUS 1(-1.0) if the subject is small in the frame, or MINUS 2(-2.0) if it is larger in the frame. This will tell the camera to take it's average meter reading and darken it down a bit to get the silhouette.


Happy Shooting!
Noel Chenier
----------
Photographer and teacher
Connect with Noel on INSTAGRAM or TWITTER or via EMAIL 
LEARNPHOTO.CA  Noel’s online photography learning community! http://www.learnphoto.ca
Photography Assignment Generator Apps now available on the app store!
Noel’s Portfolio
Work Done by My Students!
I hope you find these tips useful!
If so, it would be awesome if you would check out my Photography Assignment Generator Apps on the app store, a unique photography app that's meant to inspire you to take great photos!


Perfect for anyone taking part in a Photo 365 challenge, there are over a hundred individual assignments and hundreds of thousands of potential random ones. Versions available for iPhone/iPod and iPad, including free versions so you can try them out! Full details, including reviews and tour videos of the apps can be found at www.learnphoto.ca/apps Even if you only download the free version that would help get it up the app store lists!