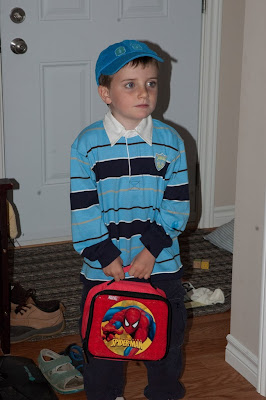
Like me you are probably mourning the end of summer, tinged with a bit of joy the kids are going back to school. If you were looking to take some great going back to school photos, here are some tips!
Tweet
GETTING READY
You are going to be rushing around, but you still want to document this special day!
Use these settings to get photos of the kids getting ready indoors. Since light will be low, use your flash.
-Use Shutter priority(TV/S) or Manual mode(M)
-ISO 400
-For Shutter Priority(TV/S)set the shutter speed to 1/200th of a second, the camera picks the aperture for you automatically. If it's blinking or red, don't worry.
-For MANUAL mode(M) set the shutter speed to 1/200th of a second, aperture to F5.6(don't worry about the meter)
-AF set to continuous (AF-C or AI Servo)
-Drive mode set to continuous
-turn on or pop up your flash. Set it to TTL or Manual. Take some test photos and adjust the flash power as necessary. If you have a external flash, you should try bouncing it off the ceiling to make the light more even. The first photo below was taken with bounce flash, the next two with direct.
It would be better to find a more plain background, like a nice wall...but the reality is you are going to be rushing here, so just get the best shot you can.
You could also get interesting images photographing detail shots/close-ups of the kid's bookbags, school supplies, shoes, etc. These would be better to do the night before...you don't want to make your kids miss the bus on the first day of school! I'm not sure if any teachers given the "I was late because my mom wasn't finished taking a macro photo of my pencil case..." excuse...
HEADING OUT!
There are great opportunity to get wonderful photos of your kids skipping along with big smiles ono their faces as they are making their way to the bus stop.
Ok. maybe they won't be that happy...
Your settings for these shots are going to be determined by the weather and the light. If the skies are clear, and the sun is shining on your kids, awesome.
-Use Shutter priority(TV/S) or Manual mode(M)
-ISO 400
-set the shutter speed to 1/500th of a second when they are walking, 1/250th if they are standing still
-if you are using Manual mode(M) adjust the aperture to get a proper meter reading.
-AF set to continuous (AF-C or AI Servo)
-Drive mode set to continuous
 |
| 1/500th was no problem here with the sun shining on these kids |
The next two pictures were done at ISO 800.
If you still can't get a good exposure with ISO 800...you could keep bumping up the ISO, but it will probably be better to just use the flash.
MORE TIPS BELOW!
I hope you find these tips useful!If so, it would be awesome if you would check out my LearnPhoto365 Photography Assignment Generator Apps on the app store, a unique photography app that's meant to inspire you to take great photos!
Perfect for anyone taking part in a Photo 365 challenge, there are over a hundred individual assignments and hundreds of thousands of potential random ones. Versions available for iPhone/iPod and iPad, including free versions so you can try them out! Full details, including reviews and tour videos of the apps can be found at www.learnphoto.ca/apps Even if you only download the free version that would help get it up the app store lists!
USING FLASH
-Use the same settings as above, but your shutter speed will lock once it's hits the highest sync speed with the flash (usually 1/200th). Manual shooting mode (M) would be better, I would suggest setting the aperture to F5.6 to let in as much light as possible (again, the meter won't be in the middle, no worries)
-Set your flash to TTL or Manual mode. Take test shots and adjust the power output as necessary.
This may result in darker backgrounds. But if you try to balance with the ambient, your shutter speed will be too low and you may get some blur. You can try a few at 1/125th or 1/60th when they are standing still, but once they start moving, you'll want to bump it back up to ensure you freeze them.
 |
| Shot with flash, there is a bit of motion blur along with the sharp image |
If you are dropping your kids off at the school you'll get lots of other photo opportunities.
Use the same settings above for outdoors shots, like outside the school or on the playground.
Depending on your school, they may even let you into the classroom to take photos. Use the settings above for the indoor getting ready photos, and bounce the flash if possible.
When the kids get off the bus, hopefully you'll have more light and be able to get the better settings.
Happy shooting, hope you get some great shots as your children embark on another year of learning and fun! And don't forget to make sure you get in a few photos too!
Noel Chenier
Tweet
----------
Photographer and teacher
Connect with Noel on INSTAGRAM or TWITTER or via EMAIL
LEARNPHOTO.CA Noel’s online photography learning community! http://www.learnphoto.ca
Photography Assignment Generator Apps now available on the app store!
Noel’s Portfolio
Work Done by My Students!


No comments:
Post a Comment